I mentioned in September that I've been asked to guest host a month at And Then We Set It On Fire... and November is my month. The process we're learning together this month is transfer paint/disperse dye.
I posted the initial instructions last week, and this is my first finish using this technique.
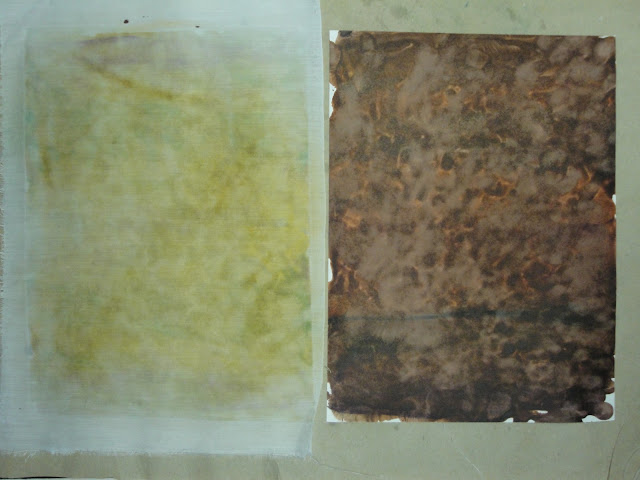
I began by using this mottled yellowy brown background - which I created by first covering my paper with orange transfer paint, then adding stripes of yellow disperse dye over that, and over it all, droplets of brown dispere dye. I then smooshed all the colours together by making a pouncing motion with the flat of my hand. Once it was dry, I ironed it to my fabric. (To get a more intense colouring, I would have had to iron longer - but I wanted this mild version.)
Next, I used this orange/yellow combo (as above) and ironed sections of it over the mottled mustardy-yellow background.
This paper (now dry) is a combination of greens. The same disperse dye green, "au naturel" on the left, mixed with a little black on the right and a little blue on the blackish looking streak/drips on top. (All the mixing was done while wet.) I have to say, this particular paper is my favourite - it produces a nice yellow green, a brilliant blue-green and a leaf green - all in the same paper! I think I've used it on every single piece of fabric I've produced for the Fire tutorials (and that's about 30 pieces of fabric - so far! - which goes to show how many times you can re-use these papers.)
I got a fern from the garden and used it as a resist before laying different sections of the green paper above all over it. ( By the way - when ironing - I've been using a padded surface, a piece of craft paper, my fabric, the transfer dye paper, and then tracing paper over that to protect the iron - and the iron has to be dry, hot and constantly moving with good pressure to get good results.)
After quilting, I added some pastel dye sticks, watercolour dye crayons and a gold leaf pen to enhance, and then decided to add some beads - for once leaving them on!
And that was it! Big fun - I highly recommend it. :)


This is lovely!
ReplyDeleteTx's for the informative post...I've not tried transfer papers/inks yet......it's tempting. YES.....of course the beads are just the right touch!!
ReplyDeleteGosh - you left the beads ON? Wonderful piece, and very tempting to try a new technique ...
ReplyDeleteOh this is gorgeous. I'm waiting for my new toys to arrive -- I should have the traditional quilt finished just in time to play with the new stuff. You're keeping me inspired.
ReplyDeleteEverything looks good Kit, but I guess I'm too lazy to do all that work and still post to blogger. I'm impressed with your determination and transition you have made. Keep on inspiring me and I'll keep on hoping I'll get there soon.
ReplyDelete@ Mary - you're very welcome! I really enjoy sharing what I learn -it makes it more fun for me.
ReplyDeleteAnd of COURSE you like the beads. :)
@Carol - you know Carol - I think waht you do is wonderful too. But if what I do helps you along, I'm glad of it. :)
ReplyDeleteamazing! my mother loves ferns! caught my eye immediately!
ReplyDeleteWow! That's really amazing! Beautiful! I'm a big fan of nature, so anything that combines fabric and nature is even better!
ReplyDeleteHi kit
ReplyDeletedid not realise it was you, thanks again, you are correct about the headrests,can't imagine how they could help with elaborate hair-dos.
I can leave comments again, Yeah!
ReplyDeleteKaunis väri!
ReplyDelete